SpringBoot整合RabbitMQ
本文最后更新于 2024-04-21,欢迎来到我的Blog! https://www.zpeng.site/
SpringBoot整合RabbitMQ
1、依赖
        <dependency>
            <groupId>org.springframework.boot</groupId>
            <artifactId>spring-boot-starter-amqp</artifactId>
        </dependency>
2、application.yml
spring:
  rabbitmq:
    # RabbitMQ服务器地址,可以是单个地址或逗号分隔的多个地址列表
    host: localhost
    # RabbitMQ服务器端口,默认为5672
    port: 5672
    # RabbitMQ用户名
    username: your_rabbitmq_username
    # RabbitMQ密码
    password: your_rabbitmq_password
    # 虚拟主机(vhost),默认为"/",请根据实际设置填写
    virtual-host: your_virtual_host

    # 连接配置(可选)
    connection:
      # 心跳间隔时间(单位:秒),默认为60
      request-heartbeat: 60
      # 网络恢复后重新尝试连接的时间间隔(单位:毫秒),默认为5000
      network-recovery-interval: 5000

    # 消费者配置(可选)
    listener:
      # 最大并发消费者数,即同时处理消息的数量
      concurrency: 1
      # 当达到最大并发消费者数时,新消息进入队列的等待策略。可选值:ACK, REQUEUE, DROP;默认为REQUEUE
      default-requeue-rejected: true
      # 是否开启批量消费模式
      batch-enabled: false
      # 批量消费模式下的消息数量阈值
      batch-size: 10
      # 批量消费模式下等待更多消息的超时时间(单位:毫秒)
      batch-timeout: 1000

    # 模板配置(可选)
    template:
      # 是否开启publisher confirms确认机制
      mandatory-publish: true
      # 是否开启return callback回调机制
      return-callbacks: true

    # 自定义交换机、队列、绑定等配置(可选)
请根据实际情况替换上述配置中的占位符(如your_rabbitmq_username、your_rabbitmq_password、your_virtual_host等)为实际的RabbitMQ服务信息。此外,如果需要自定义交换机、队列、绑定等设置,可以在spring.rabbitmq下添加相应配置,具体格式参考Spring Boot官方文档或RabbitMQ官方文档。
注意:以上配置适用于大部分常规场景,某些高级特性或特定需求可能需要更复杂的配置。在实际应用中,请根据RabbitMQ服务器的设置和项目需求调整这些配置项。
3、Direct Exchange
直连型交换机,根据消息携带的路由键将消息投递给对应队列。
大致流程,有一个队列绑定到一个直连交换机上,同时赋予一个路由键 routing key 。
然后当一个消息携带着路由值为X,这个消息通过生产者发送给交换机时,交换机就会根据这个路由值X去寻找绑定值也是X的队列。

DirectRabbitConfig
创建一个交换机绑定两个队列对应两个键
package com.example.rabbitmq.rabbit;

import org.springframework.amqp.core.Binding;
import org.springframework.amqp.core.BindingBuilder;
import org.springframework.amqp.core.DirectExchange;
import org.springframework.amqp.core.Queue;
import org.springframework.context.annotation.Bean;
import org.springframework.context.annotation.Configuration;

/**
 * @ClassName DirectRabbitConfig
 * @Description:
 * @Author: zpeng
 * @CreateDate: 2024/4/21 14:42
 */

@Configuration
public class DirectRabbitConfig {

    /**
     * 创建一个名为TestDirectQueue的队列。
     *
     * @return Queue 返回创建的队列对象。
     */
    @Bean
    public Queue TestDirectQueue() {
        // 创建一个持久化的队列
        return new Queue("TestDirectQueue", true);
    }

    /**
     * 创建一个名为TestDirectQueue2的队列。
     *
     * @return Queue 返回创建的队列对象。
     */
    @Bean
    public Queue TestDirectQueue2() {
        // 创建一个持久化的队列
        return new Queue("TestDirectQueue2", true);
    }

    /**
     * 创建一个名为TestDirectExchange的直连交换器。
     *
     * @return DirectExchange 返回创建的直连交换器对象。
     */
    @Bean
    DirectExchange TestDirectExchange() {
        // 定义一个直连交换器
        return new DirectExchange("TestDirectExchange");
    }

    /**
     * 创建一个绑定,将TestDirectQueue队列与TestDirectExchange交换器绑定,
     * 使用的路由键为TestDirectRouting。
     *
     * @return Binding 返回创建的绑定对象。
     */
    @Bean
    Binding bindingDirect() {
        // 绑定队列到交换器上
        return BindingBuilder.bind(TestDirectQueue()).to(TestDirectExchange()).with("TestDirectRouting");
    }

    @Bean
    Binding bindingDirect2() {
        // 绑定队列到交换器上
        return BindingBuilder.bind(TestDirectQueue2()).to(TestDirectExchange()).with("TestDirectRouting2");
    }
}
DirectProducer
向"TestDirectExchange"发送消息,使用"TestDirectRouting"和"TestDirectRouting2"两个Routing Key
package com.example.rabbitmq.rabbit.direct;

import org.springframework.amqp.core.AmqpTemplate;
import org.springframework.beans.factory.annotation.Autowired;
import org.springframework.web.bind.annotation.RequestMapping;
import org.springframework.web.bind.annotation.RestController;

import java.util.Date;

/**
 * @ClassName DirectController
 * @Description:
 * @Author: zpeng
 * @CreateDate: 2024/4/21 15:00
 */
@RestController // 声明一个RESTful控制器
@RequestMapping("/direct") // 为该控制器指定根URL路径
public class DirectProducer {
    @Autowired // 自动注入RabbitMQ的AmqpTemplate对象
    private AmqpTemplate rabbitTemplate;

    /**
     * 向RabbitMQ发送消息的接口。
     * 该方法不接受任何参数,也不返回任何结果。
     * 它将连续发送10条消息到指定的Exchange和Routing Key。
     */
    @RequestMapping("/send")
    public void send() {
        for (int i = 0; i < 10; i++) {
            // 构造消息内容,并打印到控制台
            String context = "第" + i + "个消息" + new Date();
            System.out.println("Sender : " + context);
            // 向"TestDirectExchange"发送消息,使用"TestDirectRouting"和"TestDirectRouting2"两个Routing Key
            this.rabbitTemplate.convertAndSend("TestDirectExchange", "TestDirectRouting", context);
            this.rabbitTemplate.convertAndSend("TestDirectExchange", "TestDirectRouting2", context);
        }
    }
}
DirectConsumer
直接消息消费者类,监听名为"TestDirectQueue"的队列。
package com.example.rabbitmq.rabbit.direct;

import org.springframework.amqp.rabbit.annotation.RabbitHandler;
import org.springframework.amqp.rabbit.annotation.RabbitListener;
import org.springframework.stereotype.Component;

/**
 * @ClassName DirectConsumer
 * @Description:
 * @Author: zpeng
 * @CreateDate: 2024/4/21 15:35
 */

/**
 * 直接消息消费者类,监听名为"TestDirectQueue"的队列。
 */
@Component
@RabbitListener(queues = {"TestDirectQueue"})
public class DirectConsumer {
    /**
     * 处理接收到的消息。
     *
     * @param testMessage 接收到的消息内容,类型为String。
     */
    @RabbitHandler
    public void process(String testMessage) {
        // 打印接收到的消息
        System.out.println("DirectProducer消费者收到消息  : " + testMessage);
    }
}
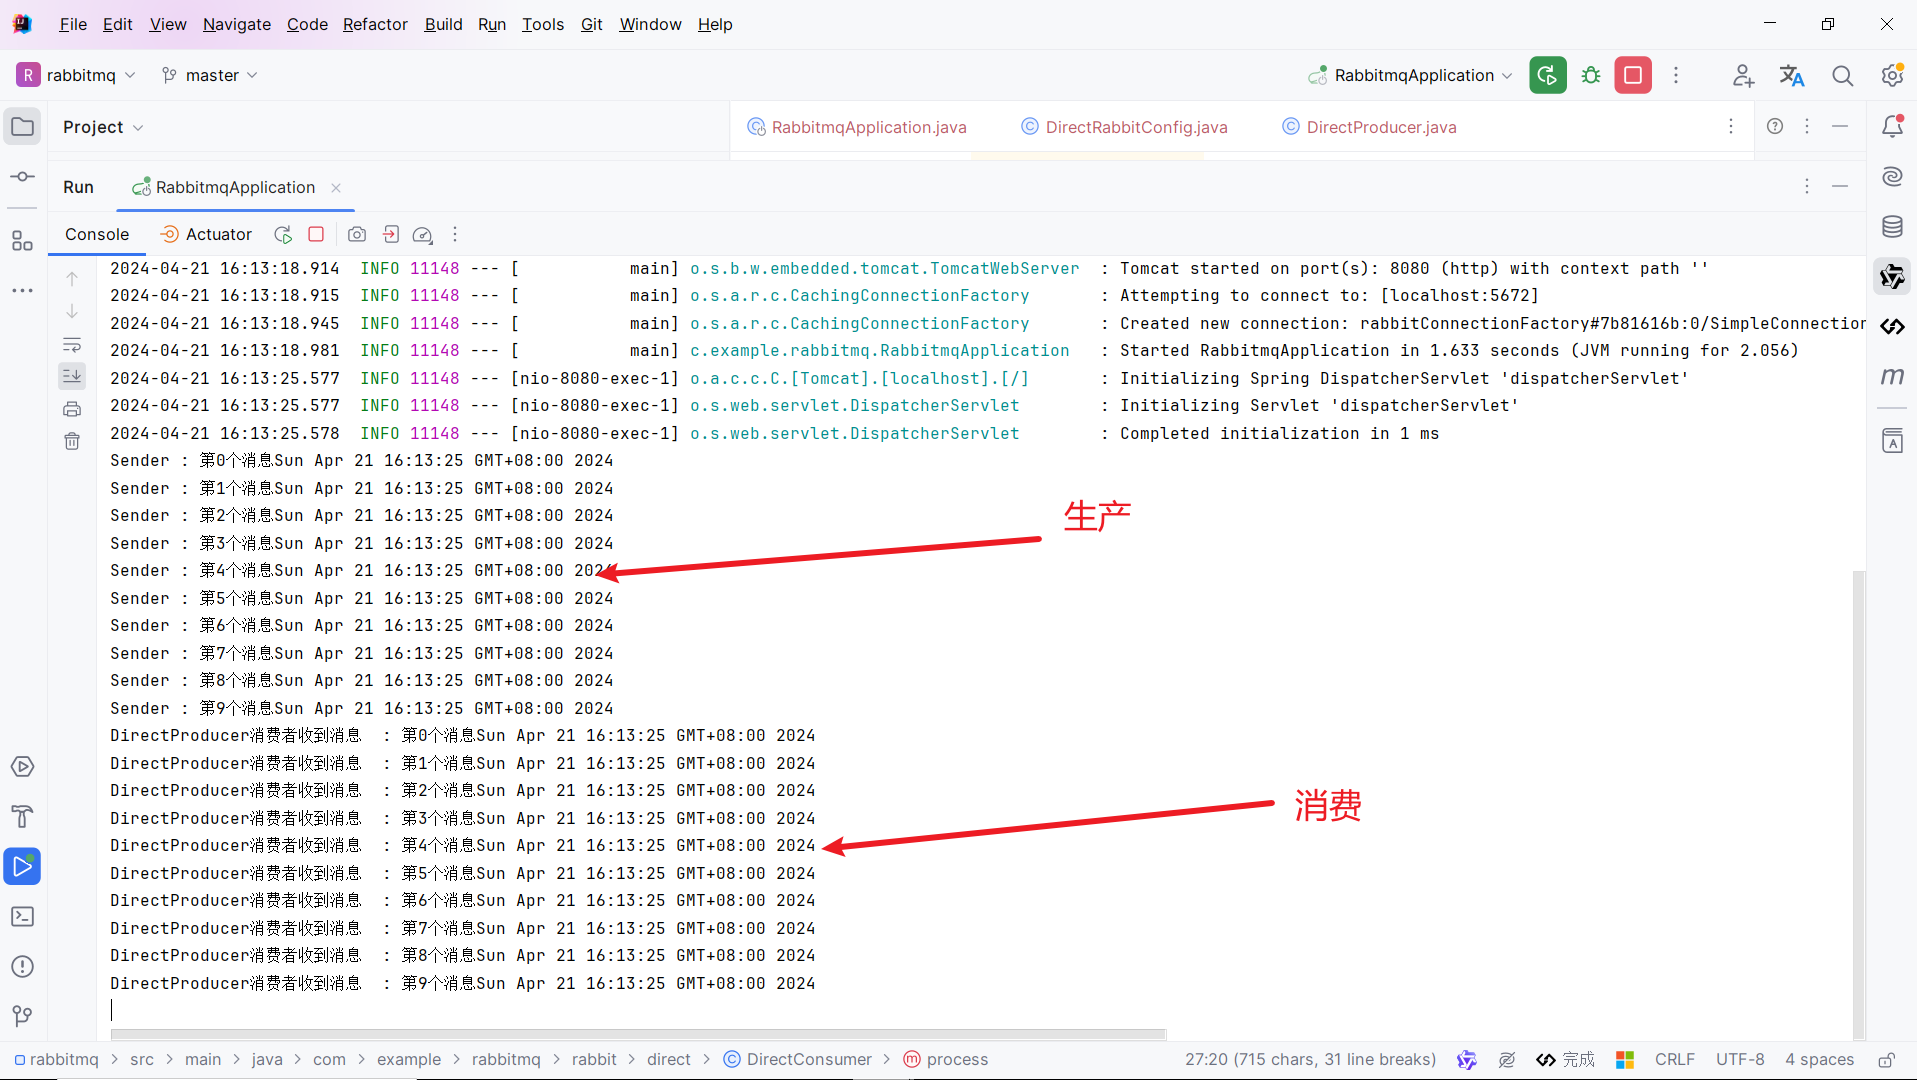
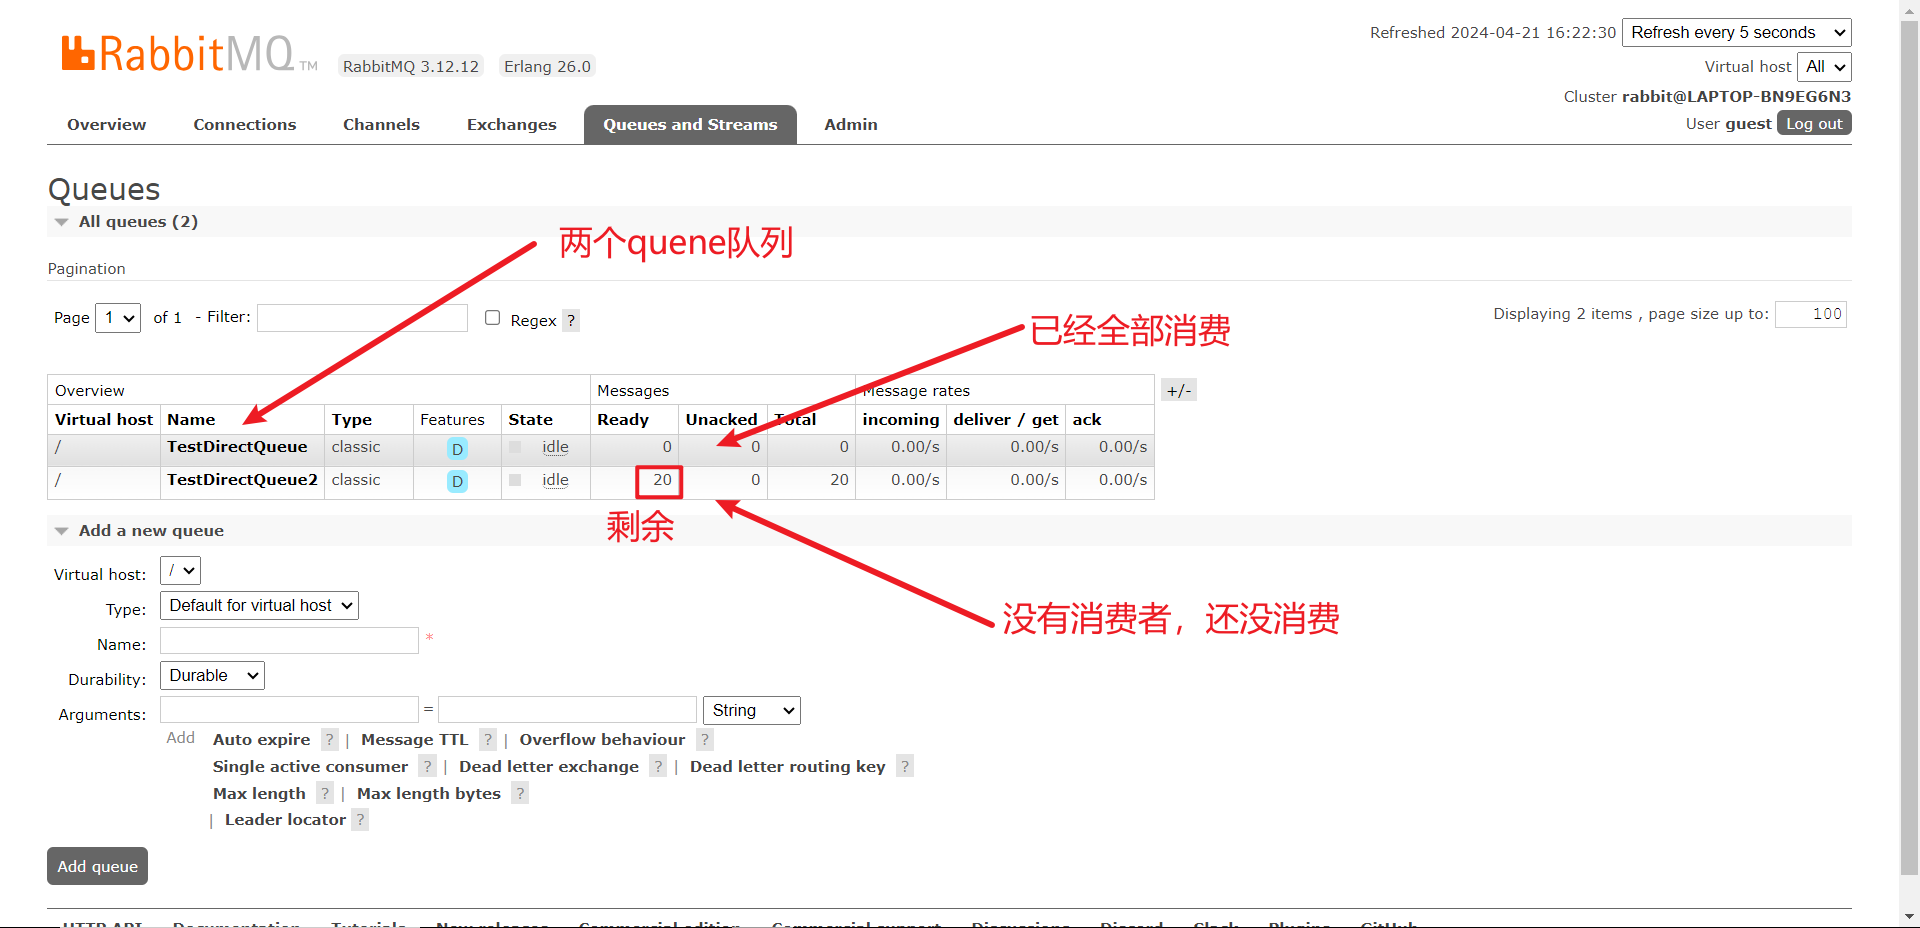
测试


4、Fanout Exchange
扇型交换机,这个交换机没有路由键概念,就算你绑了路由键也是无视的。 这个交换机在接收到消息后,会直接转发到绑定到它上面的所有队列。

FanoutRabbitConfig
创建了一个交换机绑定了三个队列
package com.example.rabbitmq.rabbit;

import org.springframework.amqp.core.Binding;
import org.springframework.amqp.core.BindingBuilder;
import org.springframework.amqp.core.FanoutExchange;
import org.springframework.amqp.core.Queue;
import org.springframework.context.annotation.Bean;
import org.springframework.context.annotation.Configuration;

/**
 * @ClassName FanoutRabbitConfig
 * @Description:
 * @Author: zpeng
 * @CreateDate: 2024/4/21 16:28
 */
@Configuration // 表示这是一个配置类,通常用于Spring框架中配置Bean的定义
public class FanoutRabbitConfig {

    /**
     * 创建一个Fanout类型的Exchange。
     * Fanout Exchange会将所有发送到该Exchange的消息广播到所有绑定到该Exchange的Queue中。
     *
     * @return 返回一个名为"TestFanoutExchange"的FanoutExchange实例。
     */
    @Bean
    FanoutExchange fanoutExchange() {
        return new FanoutExchange("TestFanoutExchange");
    }

    /**
     * 创建一个名为"fanout.A"的Queue。
     *
     * @return 返回一个Queue实例,名称为"fanout.A"。
     */
    @Bean
    public Queue queueA() {
        return new Queue("fanout.A");
    }

    /**
     * 创建一个名为"fanout.B"的Queue。
     *
     * @return 返回一个Queue实例,名称为"fanout.B"。
     */
    @Bean
    public Queue queueB() {
        return new Queue("fanout.B");
    }

    /**
     * 创建一个名为"fanout.C"的Queue。
     *
     * @return 返回一个Queue实例,名称为"fanout.C"。
     */
    @Bean
    public Queue queueC() {
        return new Queue("fanout.C");
    }

    /**
     * 将队列"fanout.A"绑定到"TestFanoutExchange"交换器上。
     * 任何发送到"TestFanoutExchange"的消息都会被广播到"fanout.A"队列。
     *
     * @return 返回一个表示队列"fanout.A"与"TestFanoutExchange"交换器绑定关系的Binding实例。
     */
    @Bean
    Binding bindingExchangeA() {
        return BindingBuilder.bind(queueA()).to(fanoutExchange());
    }

    /**
     * 将队列"fanout.B"绑定到"TestFanoutExchange"交换器上。
     * 任何发送到"TestFanoutExchange"的消息都会被广播到"fanout.B"队列。
     *
     * @return 返回一个表示队列"fanout.B"与"TestFanoutExchange"交换器绑定关系的Binding实例。
     */
    @Bean
    Binding bindingExchangeB() {
        return BindingBuilder.bind(queueB()).to(fanoutExchange());
    }

    /**
     * 将队列"fanout.C"绑定到"TestFanoutExchange"交换器上。
     * 任何发送到"TestFanoutExchange"的消息都会被广播到"fanout.C"队列。
     *
     * @return 返回一个表示队列"fanout.C"与"TestFanoutExchange"交换器绑定关系的Binding实例。
     */
    @Bean
    Binding bindingExchangeC() {
        return BindingBuilder.bind(queueC()).to(fanoutExchange());
    }
}
FanoutProducer
发送消息到RabbitMQ的Fanout类型交换器。
package com.example.rabbitmq.rabbit.fanout;

import org.springframework.amqp.core.AmqpTemplate;
import org.springframework.beans.factory.annotation.Autowired;
import org.springframework.web.bind.annotation.RequestMapping;
import org.springframework.web.bind.annotation.RestController;

/**
 * @ClassName FanoutProducer
 * @Description:
 * @Author: zpeng
 * @CreateDate: 2024/4/21 16:30
 */
@RestController // 表示这是一个RESTful API的控制器
@RequestMapping("/fanout")
public class FanoutProducer {

    @Autowired // 自动注入RabbitMQ的模板类,用于发送消息
    private AmqpTemplate rabbitTemplate;

    /**
     * 发送消息到RabbitMQ的Fanout类型交换器。
     * 该方法不接受任何参数,也不返回任何内容。
     */
    @RequestMapping("/send")
    public void send() {
        String context = "hello,fanout message!"; // 消息内容
        System.out.println("Sender : " + context); // 打印发送的消息
        rabbitTemplate.convertAndSend("TestFanoutExchange", null, context); // 发送消息到交换器
    }
}
FanoutConsumerA
该组件是一个RabbitMQ的消费者,监听名为"fanout.A"的扇出交换器。
package com.example.rabbitmq.rabbit.fanout;

import org.springframework.amqp.rabbit.annotation.RabbitHandler;
import org.springframework.amqp.rabbit.annotation.RabbitListener;
import org.springframework.stereotype.Component;

/**
 * @ClassName FanoutConsumer
 * @Description:
 * @Author: zpeng
 * @CreateDate: 2024/4/21 16:34
 */

/**
 * 该组件是一个RabbitMQ的消费者,监听名为"fanout.A"的扇出交换器。
 * 扇出交换器会将消息广播到所有绑定到它的队列,这里的消费者会处理这些消息。
 */
@Component
@RabbitListener(queues = "fanout.A")
public class FanoutConsumerA {

    /**
     * 处理接收到的消息。
     *
     * @param testMessage 接收到的消息内容,类型为String。
     *                    该方法会打印出消息的内容到控制台。
     */
    @RabbitHandler
    public void process(String testMessage) {
        System.out.println("FanoutConsumerA消费者收到消息  : " + testMessage.toString());
    }
}
FanoutConsumerB
该组件是一个RabbitMQ的消费者,专门监听名为"fanout.B"的扇出交换器。
package com.example.rabbitmq.rabbit.fanout;

import org.springframework.amqp.rabbit.annotation.RabbitHandler;
import org.springframework.amqp.rabbit.annotation.RabbitListener;
import org.springframework.stereotype.Component;

/**
 * @ClassName FanoutConsumerB
 * @Description:
 * @Author: zpeng
 * @CreateDate: 2024/4/21 16:37
 */

/**
 * 该组件是一个RabbitMQ的消费者,专门监听名为"fanout.B"的扇出交换器。
 * 扇出交换器会将消息广播到所有绑定到它的队列,这个消费者就是用来处理这些被广播的消息。
 */
@Component
@RabbitListener(queues = "fanout.B")
public class FanoutConsumerB {

    /**
     * 处理接收到的消息。
     *
     * @param testMessage 接收到的消息内容,类型为String。
     *                    该方法会将消息打印到控制台,以示接收成功。
     */
    @RabbitHandler
    public void process(String testMessage) {
        System.out.println("FanoutConsumerB消费者收到消息  : " + testMessage.toString());
    }
}
测试


5、Topic Exchange
主题交换机,这个交换机其实跟直连交换机流程差不多,但是它的特点就是在它的路由键和绑定键之间是有规则的。
①*(星号)仅代表一个单词
②#(井号)代表任意个单词

TopicRabbitConfig
定义了一个交换机绑定了两个队列
package com.example.rabbitmq.rabbit;

import org.springframework.amqp.core.Binding;
import org.springframework.amqp.core.BindingBuilder;
import org.springframework.amqp.core.Queue;
import org.springframework.amqp.core.TopicExchange;
import org.springframework.context.annotation.Bean;
import org.springframework.context.annotation.Configuration;

/**
 * @ClassName TopicRabbitConfig
 * @Description:
 * @Author: zpeng
 * @CreateDate: 2024/4/21 16:53
 */
@Configuration // 标识为配置类
public class TopicRabbitConfig {

    /**
     * 创建一个主题类型的交换器。
     * @return 返回一个名为"TestTopicExchange"的主题交换器实例。
     */
    @Bean
    TopicExchange exchange() {
        return new TopicExchange("TestTopicExchange");
    }

    /**
     * 创建第一个队列。
     * @return 返回一个名为"TestTopicQueueA"的队列实例。
     */
    @Bean
    public Queue firstQueue() {
        return new Queue("TestTopicQueueA");
    }

    /**
     * 创建第二个队列。
     * @return 返回一个名为"TestTopicQueueB"的队列实例。
     */
    @Bean
    public Queue secondQueue() {
        return new Queue("TestTopicQueueB");
    }

    /**
     * 将第一个队列绑定到交换器上,监听"topic.man"模式的消息。
     * @return 返回一个绑定实例,将"TestTopicQueueA"队列与"TestTopicExchange"交换器绑定。
     */
    @Bean
    Binding bindingExchangeMessage() {
        return BindingBuilder.bind(firstQueue()).to(exchange()).with("topic.man");
    }

    /**
     * 将第二个队列绑定到交换器上,监听"topic.#"模式的消息。
     * @return 返回一个绑定实例,将"TestTopicQueueB"队列与"TestTopicExchange"交换器绑定。
     */
    @Bean
    Binding bindingExchangeMessage2() {
        return BindingBuilder.bind(secondQueue()).to(exchange()).with("topic.#");
    }

}
TopicProducer
TopicProducer类用于演示通过RabbitMQ发送主题类型的消息。
package com.example.rabbitmq.rabbit.topic;

import org.springframework.amqp.core.AmqpTemplate;
import org.springframework.beans.factory.annotation.Autowired;
import org.springframework.web.bind.annotation.RequestMapping;
import org.springframework.web.bind.annotation.RestController;

/**
 * @ClassName TopicProducer
 * @Description: TopicProducer类用于演示通过RabbitMQ发送主题类型的消息。
 * @Author: zpeng
 * @CreateDate: 2024/4/21 16:56
 */
@RestController
@RequestMapping("/topic")
public class TopicProducer {

    @Autowired
    private AmqpTemplate rabbitTemplate; // 自动注入RabbitMQ的模板类,用于发送消息

    /**
     * 发送主题为"topic.man"的消息。
     * 这个方法不需要参数,发送一条指定路由键的消息到TestTopicExchange交换器。
     */
    @RequestMapping("/send1")
    public void send1() {
        System.out.println("TopicProducer1 发送消息");
        rabbitTemplate.convertAndSend("TestTopicExchange", "topic.man", "推送消息,路由键为topic.man");
    }

    /**
     * 发送主题为"topic.woman"的消息。
     * 同样不需要参数,此方法发送一条路由键不同的消息到相同的交换器TestTopicExchange。
     */
    @RequestMapping("/send2")
    public void send2() {
        System.out.println("TopicProducer2 发送消息");
        rabbitTemplate.convertAndSend("TestTopicExchange", "topic.woman", "推送消息,路由键为topic.woman");
    }
}
TopicConsumerA
该类为一个RabbitMQ的消费者,监听名为"TestTopicQueueA"的队列。
package com.example.rabbitmq.rabbit.topic;

import org.springframework.amqp.rabbit.annotation.RabbitHandler;
import org.springframework.amqp.rabbit.annotation.RabbitListener;
import org.springframework.stereotype.Component;

/**
 * @ClassName TopicConsumer
 * @Description: 该类为一个RabbitMQ的消费者,监听名为"TestTopicQueueA"的队列。
 * @Author: zpeng
 * @CreateDate: 2024/4/21 16:59
 */
@Component
@RabbitListener(queues = "TestTopicQueueA")
public class TopicConsumerA {

    /**
     * 当收到消息时处理消息的逻辑。
     *
     * @param testMessage 接收到的消息内容。
     */
    @RabbitHandler
    public void receive(String testMessage) {
        System.out.println("TopicConsumerA消费者收到消息  : " + testMessage);
    }

}
TopicConsumerB
该类为RabbitMQ的Topic模式消费者B,监听名为"TestTopicQueueB"的队列。
package com.example.rabbitmq.rabbit.topic;

import org.springframework.amqp.rabbit.annotation.RabbitHandler;
import org.springframework.amqp.rabbit.annotation.RabbitListener;
import org.springframework.stereotype.Component;

/**
 * @ClassName TopicConsumer
 * @Description: 该类为RabbitMQ的Topic模式消费者B,监听名为"TestTopicQueueB"的队列。
 * @Author: zpeng
 * @CreateDate: 2024/4/21 16:59
 */
@Component
@RabbitListener(queues = "TestTopicQueueB")
public class TopicConsumerB {

    /**
     * 处理接收到的消息。
     *
     * @param testMessage 接收到的消息内容,类型为String。
     *                    该方法将打印出接收到的消息。
     */
    @RabbitHandler
    public void receive(String testMessage) {
        System.out.println("TopicConsumerB消费者收到消息  : " + testMessage);
    }

}
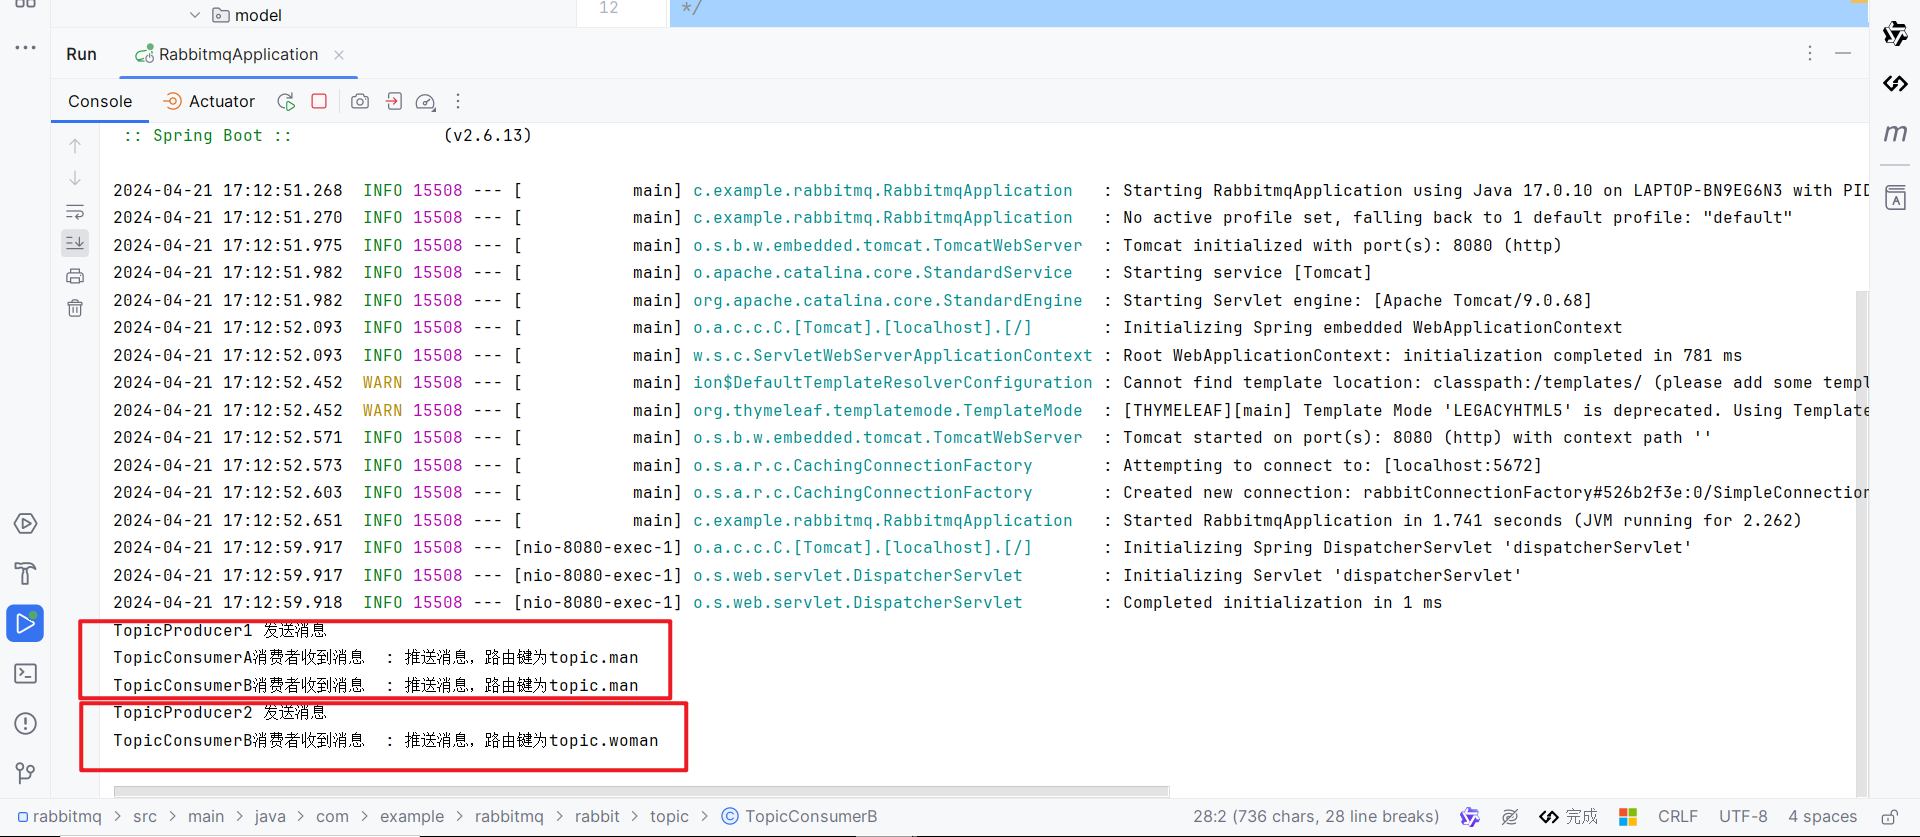
测试

- 感谢你赐予我前进的力量


